Types of the 2¢ Washington
Flat Plate and Rotary: Types I, Ia, II, and III
Ten Areas that Distinguish Types I, Ia, II, and III
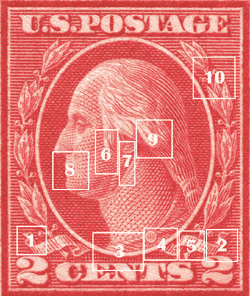
| 1 | Left Ribbon (end) | I, Ia and II from III |
| 2 | Right Ribbon | I, Ia and II from III |
| 3 | Toga Rope | I from Ia and II |
| 4 | Toga Button | I from Ia and II |
| 5 | Right Ribbon (middle) | I and Ia from II and III |
| 6 | Line Between Cheek and Sideburn | I and Ia from II from III |
| 7 | Line Under Ear | I and Ia from II from III |
| 8 | Curve of Mouth | I, Ia and II from III |
| 9 | Locks of Hair | I and Ia from II from III |
| 10 | Top Right Laurel Berry | I, Ia and II from III |
Only the flat plate and rotary press printings of the 2c Washington may have the following types. Be aware that many of these stamps have similar traits compared to the offset stamps. In particular, many of these stamps have 4 rows of 3 dots above the lip, a characteristic of the Type VII offset stamp. Looking for a particular Type of offset stamp on a flat plate or rotary stamp can be frustrating and time-consuming. First determine if the stamp is engraved i.e. flat plate or rotary press, or not engraved, i.e. offset. If your stamp is offset, you are on the wrong page and should go here:
Further, while Type I is found on both flat plate and rotary stamps, Type Ia is found ONLY on flat plate stamps, and Type II and Type III ONLY on rotary press stamps. Before determining the Type of the 2c stamp, it is highly recommended that you determine the method of printing. In particular, the scarce 2c Type Ia stamp is NEVER found on a rotary press stamp and the 2c Type II stamp is NEVER found on the flat plate stamp. Another way to put it is that if the stamp has a strong toga rope line and button, it is either Type Ia if it is flat plate and Type II if it is rotary and has only one line of shading in the ribbons, see below
To use this identification guide, you will need to link to the appropriate page by clicking on the appropriate number on either the picture or in the chart below. The following chart provides links to a comparison of each of the Types for all ten areas. Most of these stamps can be identified using areas 1 through 5. In fact, the vast majority of these stamps can be sorted by type by examining only areas 1 and 3, the left ribbon and the toga rope. The areas 6 through 10 have more subtle differences, but with practice they will become great tools in your identification arsenal. In the case of a cancellation covering these areas, or if the ink is light, or you simply have a faded copy, you will need to examine many of the areas. In particular, if you think the stamp is a scarcer variety, you should examine all of the areas for positive identification. A powerful magnifying glass, microscope, or a high resolution scan (600 to 1200 dpi) will greatly aid in identifying the type.
Caution:
Since the value of a particular stamp is often determined by the design type, it is little wonder that there are many forgeries in which the more common design is altered to look like the more expensive design. A common alteration is to make a Type II stamp out of a Type III stamp by simply scratching out one of the red lines in the ribbon ends. Since there are many other features that distinguish the Type II stamps from the Type III stamps, this doesn't fool many seasoned collectors.
The Type I can be altered to look like a Type Ia by strengthening the Toga rope and button. This alteration can be detected by placing a piece of foil over the suspect area, rubbing lightly and examining the impression made. If the design was altered the impression will be that of the weaker type I stamp, since only the engraved portion will show up in the impression, anything drawn in will not. Since Type Ia stamps are rare, Scott 482a and Scott 500, this test should be done in every case to eliminate obvious fakes. We highly recommend having ALL type Ia stamps certified before buying or selling.